Minecraft Mod 开发
因为某些原因,找不到合适的 mod,所以捡起来 Minecraft Mod 开发,其实在我刚玩 Minecraft 的时候也学过一点点,然后入坑了 Java,后来就放弃了。时隔多年,捡起 Mod 开发,加上在捡回的这个过程,发现网上很多资料没有 updated,于是边开发,边写这个文章。
在部署环境之前,需要了解下一些知识,然后这个不是 Java 教程,只是一个在我学习中遇到的坑,和一些基本知识,然后也会记录一些过时教程和现在的区别。
目录
准备工作
Forge & FML
首先要了解下 Forge & Forge Mod Loader,在 MinecraftForge 团队的 GitHub wiki 里能找到这个问题的答案,(虽然那个项目已经被存档 (archived) 了。
FML was conceived to address the need for Minecraft Forge to have a reliable mod loading component on the server. However it is and will remain independent of Minecraft Forge.
FML has since taken over all modloading responsibility for Minecraft Forge, since about mid 1.2.5, including the client.
Minecraft Forge ships with a recent version of FML. Generally new versions of FML are submitted as pull requests to Minecraft Forge as needed, or occasionally to bundle up minor fixes. 来源
大概什么意思呢,FML 前期只是为了 Minecraft Forge 有一个可靠的服务端 mod 加载模组,但是在 1.2.5 版本中期左右,也开始负责客户端 mod 的加载,这么看似乎 FML 能代替 Forge?并不,Forge 和 FML 是两个项目。
Forge is an API, of sorts, to allow mods to work without creating conflicts due to all the base-class editing. Instead Forge does it once and mods just use hooks to make the changes they need.
ModLoader is an API, of sorts, that allows mods to work without creating conflicts, blah blah blah, written by different authors with a slightly different feature set.
FML (Forge ModLoader) is an API-API that allows Forge to run ModLoader mods without needing ModLoader installed. 来源
Forge 是一个 API(Application programming interface),提供了一个接口能让开发者容易的和 Minecraft 进行交会并且不会产生冲突. ModLoader 也是个 API,可以让很多 mod 一起运行并不产生冲突,而 FML 是让 Forge 运行那些原本需要 ModLoader 才能运行的 mod 运行。
准备部署
在编译之前,需要准别下文件。
- JDK (1.8)
- IDE (推荐 IntelliJ IDEA)
- MDK (Minecraft Dev Kit?)
JDK 请要确保是 1.8,我使用 1.10 的时候遇到很多错误,(也希望 MinecraftForge 团队升级下.) 下载地址就请自行解决吧. IntelliJ IDEA 是 JetBrain 家的 JAVA/Kotlin 开发的 IDE,有社区版. MDK 需要从MinecrafForge 官网下载,找到稳定版就好了,下载完成后 解压到一个目录下即可。
编译
编译部分按照 README 里的进行操作。
打开命令行进入 MDK 的目录,使用命令
| |
在一切结束后,打开 IDEA,导入这个项目,然后选择’import project from external model’中的 Gradle,下一步之后选择’Use default gradle wrapper(recommended),然后 IDEA 就会自己安装依赖等,这个过程可能需要一些时间。在 IDEA 完成建立索引之后,关闭 IDEA,使用命令行进入 MDK 目录,并使用
| |
等命令跑完,进入 IDEA 选择右上角的 Client 并运行,游戏就会被打开,并自动安装好了 forge 以及一个 examplemod.
文件结构
我们只需要在意 src/中文件就好了,这里是源码的存放地。
| |
java/ 下放着 Mod 的源码,resource/里则是 Mod 的资源文件。
| |
mcmod.info 是 Mod 的一些基本信息,名字,id,版本,作者,介绍和依赖。
至于最主要的 ExampleMod.java,下一章再说吧。
注意事项
在我编译的过程中,使用的 JDK 版本为 1.10,然后遇到 “Could not determine java version from ‘10.0.1’.",寻求解决方法的过程中,有提到更改 gradle 版本
gradle/wrapper/gradle-wrapper.properties

#Thu Jun 14 13:39:50 AEST 2018
distributionBase=GRADLE_USER_HOME
distributionPath=wrapper/dists
zipStoreBase=GRADLE_USER_HOME
zipStorePath=wrapper/dists
distributionUrl=https\://services.gradle.org/distributions/gradle-2.14-all.zip
将其中的 distributionUrl 后面的版本好改为 4.2,这样确实解决了"Could not determine java version from ‘10.0.1’.“错误,但在剩下的部分中又遇到了 “Execution failed for task ‘:recompileMc’.",这个部分也是寻找了很久的解决方法,也没有看到问题所在。后来我把 JDK 1.10 降级成 1.8,重新编译,就没有遇到 以上的俩个错误了,这也是为什么在准别部署的时候特别提到要确保是 JDK 1.8 版本。
开发
构思
比如说,我现在要做一个红宝石 Mod,那他就应该包括
- 红宝石锭
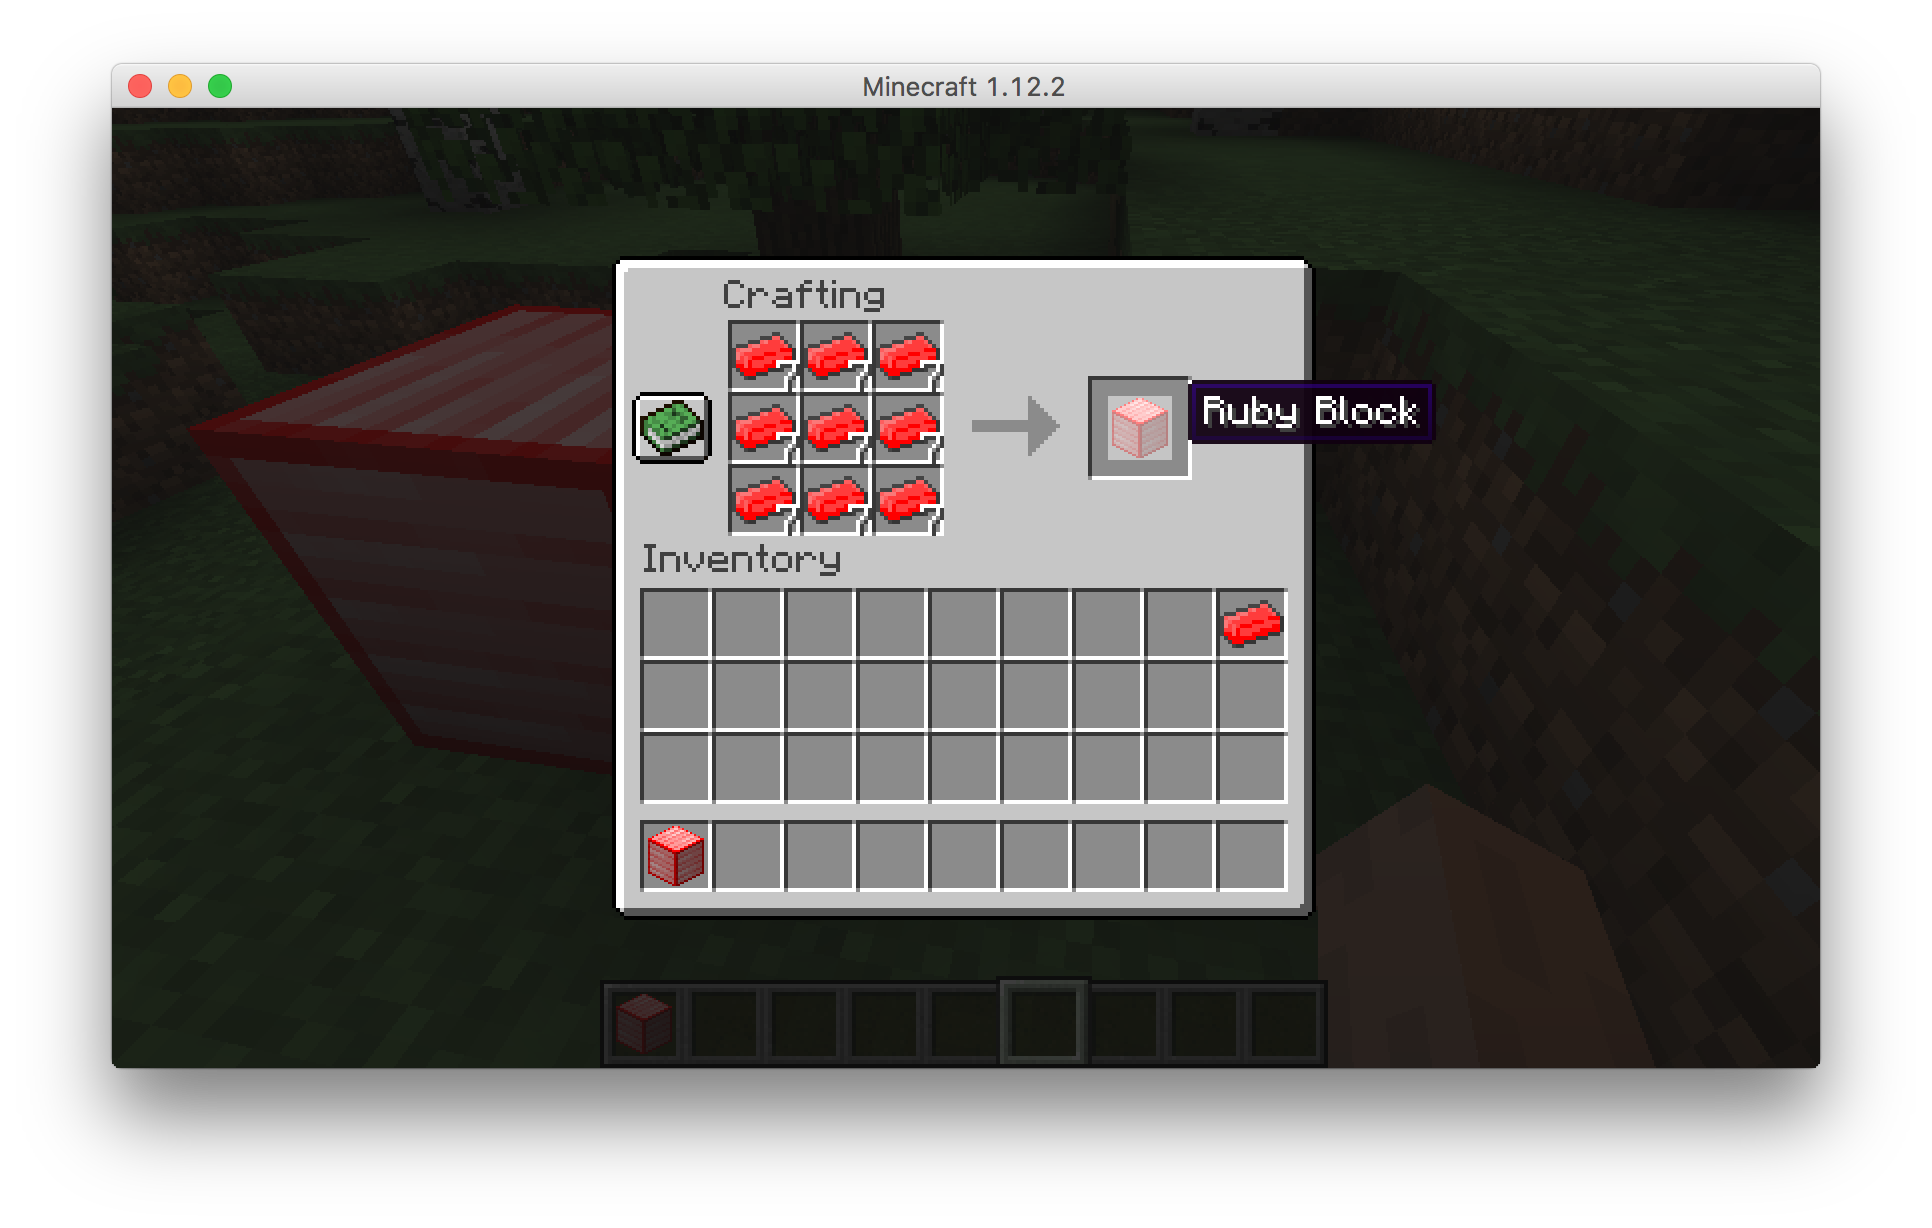
- 红宝石块 -> 9 个
- 合成 -> 8 个红石 + 1 个铁锭
- 红宝石块
- 合成 -> 9 个红宝石锭
- 红宝石镐
- 配方如同铁镐 (铁换成红宝石),效率和钻石镐一样。
这样,完成了这个 Mod 的一个制作方向,当然可以在制作的过程中进行修改。
然后就是命名
- 红宝石 Ruby
- 红宝石锭 Ruby Ingot
- 红宝石块 Ruby Block
- 红宝石镐 Ruby Pickaxe
配置 Mod
接下来就是根据以上的信息配置 Mod.
| |
首先删掉 java/目录中的东西,并且以自己的域名作为包名,然后再建立一个包,名字为 modid,之后新建一个类取名为 Ruby,这个就是 mod 的主类,所有方块,物品,实体等都要通过这个类在游戏中进行注册。接着在 resources 下新建一个 assets 文件夹,里面还有一个 modid 的文件夹,我使用的 modid 就是它的名字 ruby.
所以在 java/里我的目录结构就是
| |
然后来看一下 resources/目录的结构
| |
接着,修改 mcmod.info.
| |
那么,根据以上信息,就可以完成一下这个 mcmod.info,除了 modid 为必须项,其他都是选填。
| |
update, version 和 mcversion 是不推荐填写的,因为在便宜过程中,它会根据 build.gradle 设置而改变
 processResources {
    // this will ensure that this task is redone when the versions change.
    inputs.property "version", project.version
    inputs.property "mcversion", project.minecraft.version

    // replace stuff in mcmod.info, nothing else
    from(sourceSets.main.resources.srcDirs) {
        include 'mcmod.info'

        // replace version and mcversion
        expand 'version':project.version, 'mcversion':project.minecraft.version
    }

    // copy everything else except the mcmod.info
    from(sourceSets.main.resources.srcDirs) {
        exclude 'mcmod.info'
    }
}
然后进入 Ruby.java 里,修改一下配置,让 forge 可以读取到这个 mcmod.info 文件。
| |
@Mod 这个 Annotation(注释) 是让 Forge 知道,这个是一个 mod 的入口,之中 modid 是必填,useMetadata 就是会让 mcmod.info 的内容覆盖你在这个注释中填写的内容。
这样,进入游戏
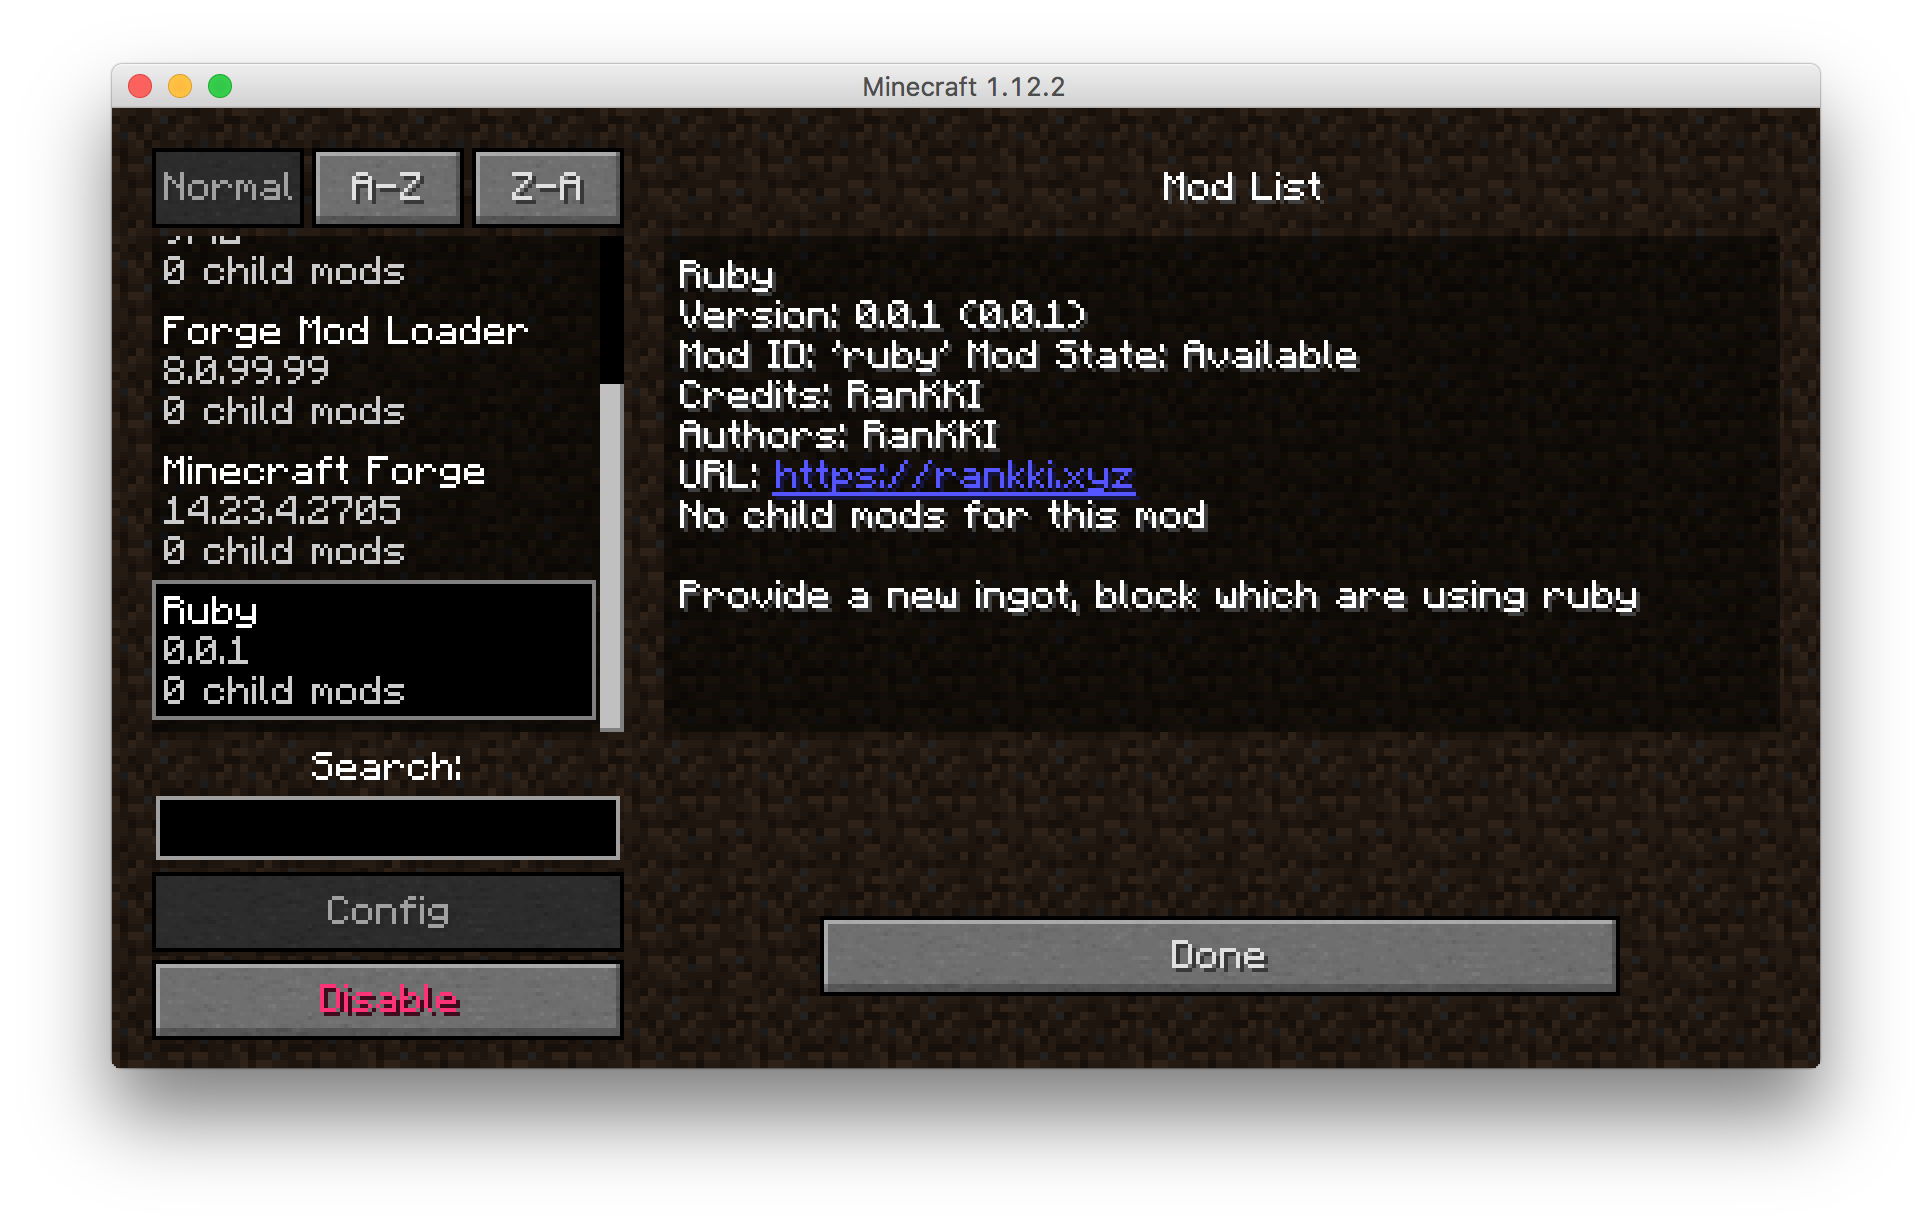 就可以看到我们的 mod 啦。上面的信息也都是我们设置的,接下来就是新建一个物品,红宝石锭。
新的物品
在 mod 包 ruby 下新建一个包,叫做 items,并新建一个类 IngotRuby,并且继承 net.minecraft.item.Item.
无论是一个方块,还是物品,都需要一个 unlocalizedName,这个名字是用于在语言文件中的 key,然后还需要设置一下在这个东西在游戏中的注册名,比如 minecraft:bucket 就是桶在游戏中的注册名。接着就是设置在创造模式中,他可以在哪个分类中找到。
| |
下一步就是为这个物品添加材质,这里就直接拿铁锭换色吧.(图片上传不到图床,等下就直接在游戏中展示吧.)
设置材质的话,把制作好.png 放入 resources/assets/modid/textures/item/里,并重命名为这个物品的名字,并在 models/item/里新建一个物品名字的 json 文件,ingotruby.json
| |
在完成这些之后,我们还需要在游戏中注册一下这个物品才行,进入到主类 Ruby.java,在 preinit 里添加注册需要的代码。
首先需要将这个物品注册到游戏中,可以调用 ForgeRegistries,它提供了物品,方块,等等等,各种你需要的注册。根据自己的风格,可以选择不同的方法,但总体来讲,必须要注册才能在游戏中得到它。
我在 IngotRuby 这个物品中添加了一个方法,
| |
所以,在主类中,新建一个 IngotRuby 出来,并且调用它的 register 方法。
| |
注册模型之前
在注册材质之前,需要理解一些内容,FML 是支持客户端与服务器端的 mod 加载,但这并不意味着它需要加载所有东西。比如说在 server 端,他就不需要加载材质,这是一个很没有必要的东西。因为材质只属于客户端,所以就延伸出来了 proxy,字面理解是代理,实际意思也是代理..
万幸的是 Forge 提供了接口让开发者可以简单的调用,@SidedProxy,它有两个参数,clientSide 和 serverSide,都是选填。
| |
在为空,也就是不填入的情况下,它会默认使用当前类中的 ClientProxy 和 ServerProxy,因为现在的 mod 并不复杂,所以只要在主类中新建两个类就好了,使我们的主类看起来像这样。
| |
注册模型
我们要把注册模型这部放入 ClientProxy 里,因为前面提到过,服务端是不需要加载模型的。
在 ingotRuby 里面加入一个方法,并在 ClientProxy.loadModel 调用
| |
| |
然后在 init 里加入 proxy.loadModel();
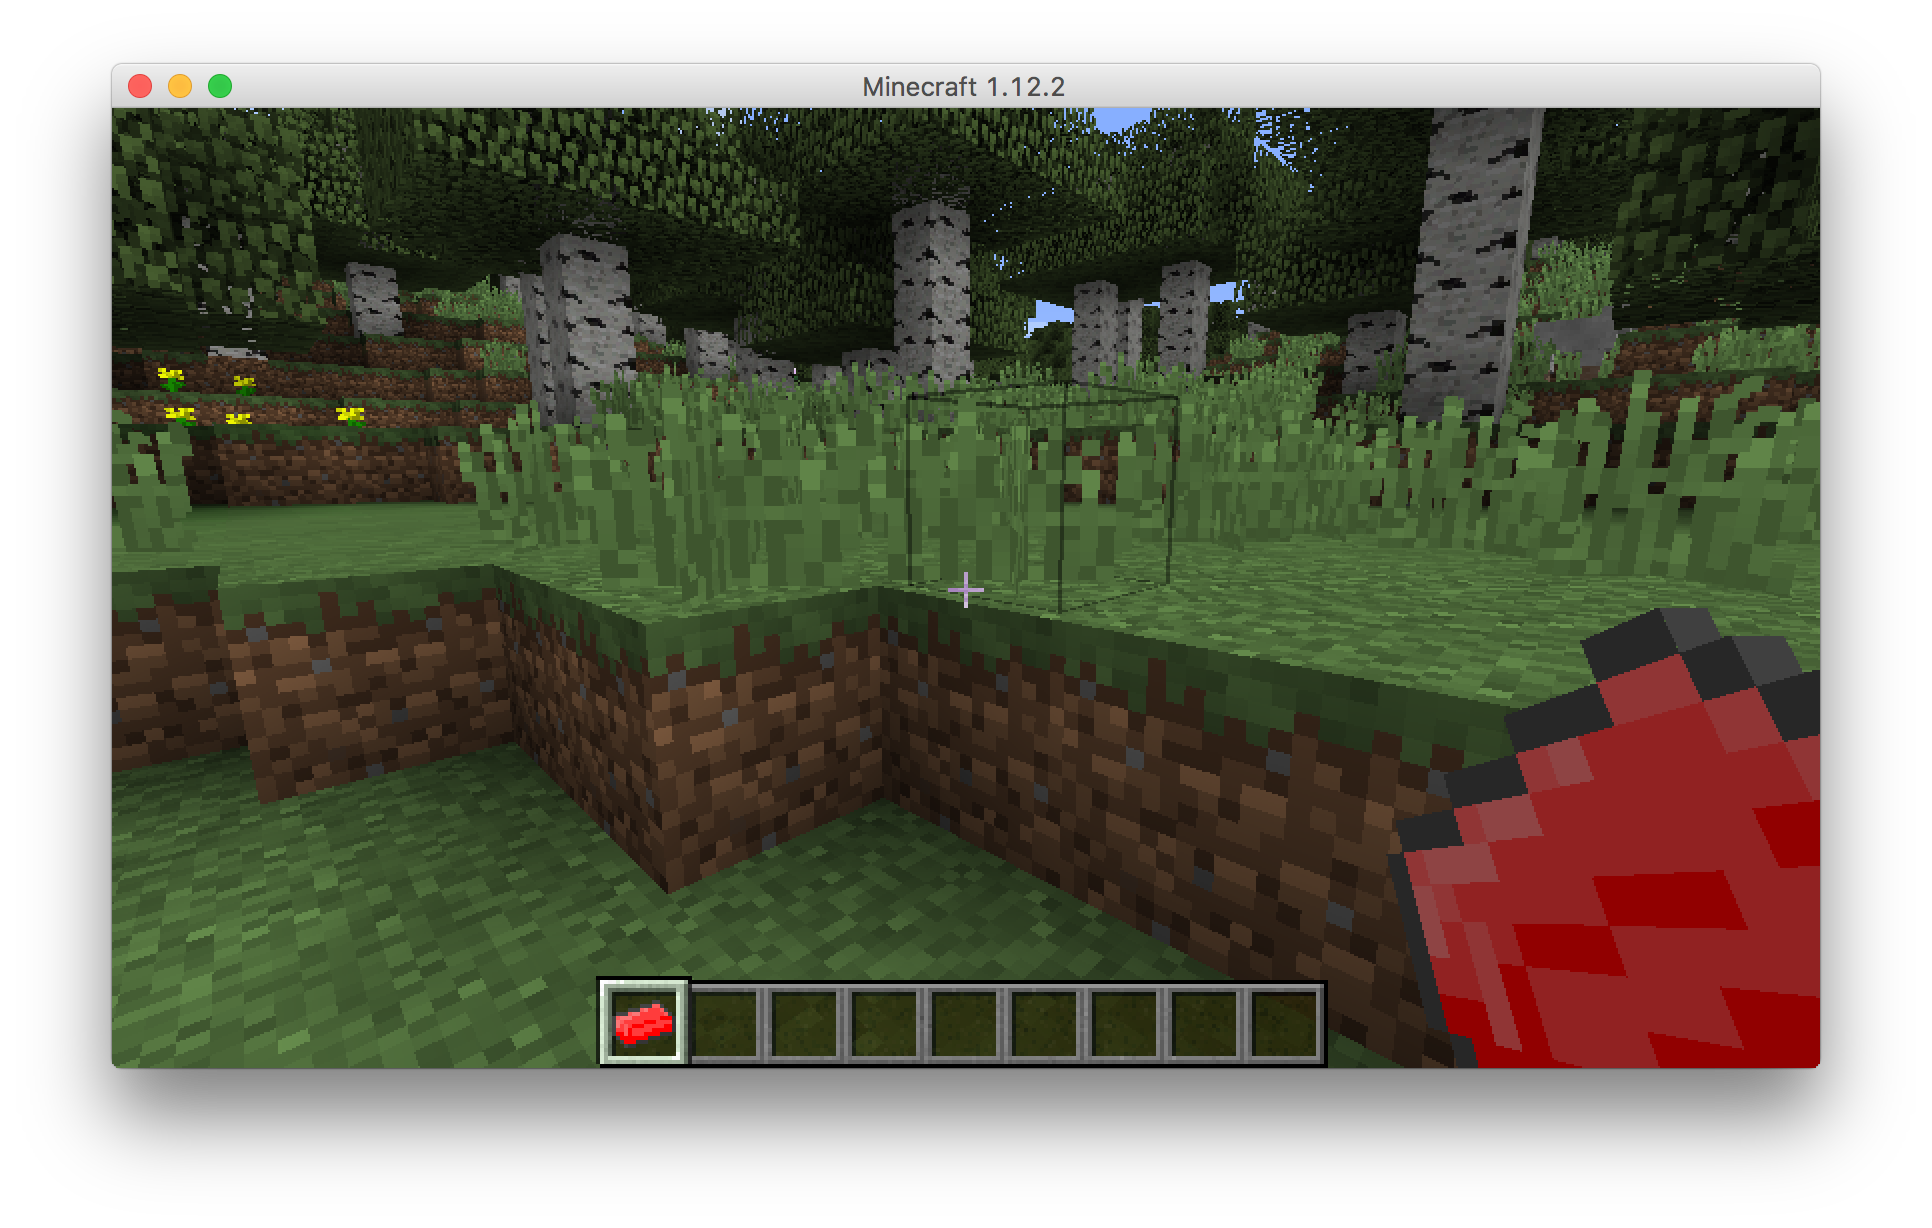
这时候进入游戏,在创造模式中的菜单里或者通过指令 /give <Player> ruby:ingotRuby 就可以看到这个新建的红宝石锭了
注册语言
当你把鼠标移动到这个物品的时候,你会发现它的名字并不是一个 ‘名字’,而是类似于代号,或者说 key.
在 resources/modid/下建立一个新文件夹 lang/ ,并新建一个文件 en_us.lang.
| |
里面的每一行都是一个物品的翻译。
en_us.lang

tile.ruby.ingotRuby.name=Ruby Ingot
格式为 item.modid.<itemname>.name=<Name>
如果这个物品是方块的话,就需要将前面的 item 换成 tile
这时候再进游戏,就可以看到物品已经不是像之前一样了,而是成为了一个通俗易懂的名称。
一些注意事项
很多过时的教程使用了
GameRegistry.register(block)
但这个方法已经被设置为 private 了,根据注释
| |
要使用 ForgeRegistries 或者通过 RegistryEvent.Register
根据 pack.mcmeta
A pack_format of 3 should be used starting with Minecraft 1.11. All resources, including language files, should be lowercase (eg: en_us.lang).
所有文件必须是小写的,包括语言文件。
新的方块
首先是要在 xyz.rankki.ruby 下建立一个 blocks 包,使现在的 mod 源码目录看起来像是这样
$ tree java/

java
└── xyz
    └── rankki
        └── ruby
            ├── Ruby.java
            ├── blocks
            └── items
                └── ingotRuby.java

5 directories, 2 files
并在 blocks 里新建一个 BlockRuby.java,并继承 net.minecraft.block.Block
| |
这个 Material 是一个方块必须的。它是这个方块的材质,(不是那个看的), Material 定义了这个方块的属性,比如是不是液体,或者可不可以阻挡光线,可不可以阻挡移动之类的。只要使用普通的岩石 (Material.ROCK) 就可以了,
同时,和普通物品一样,需要设置一些其他基础的信息,registryName, unlocalizedName 之类的。
| |
这个时候,进入游戏你会发现它并没有在游戏里出现。因为方块需要 blockstate,在部署环境的时候已经建立好了这个位置,在里面新建一个文件,“blockruby.json”,并打开,内容如下 也是根据自己的需求进行更改。
| |
然后在 models/block 里面新建文件 blockruby.json,
| |
然而,游戏里还是没有你这个方块,问什么呢?
首先,我们要知道,现在制作的这个方块,它就是个方块,玩家拿到的都叫物品,所以也要为这个方块建立一个物品。
在 resources 里的 models/item 里添加一个 blockruby.json,但这个内容和物品的内容则不一样,直接继承方块。
| |
然后在方块的 register 方法里注册一个物品。
| |
就行了,接下来就是材质的问题,在前面已经设置好了材质,你在游戏里放下这个方块也是有材质的,但这个物品嘛,就没有材质了,所以 根据前一章所说的,加入个 registerTextures 方法就行了,并在 loadModel 调用。
| |
接着在语言文件中添加这个方块的名字
tile.ruby.BlockRuby.name=Ruby Block
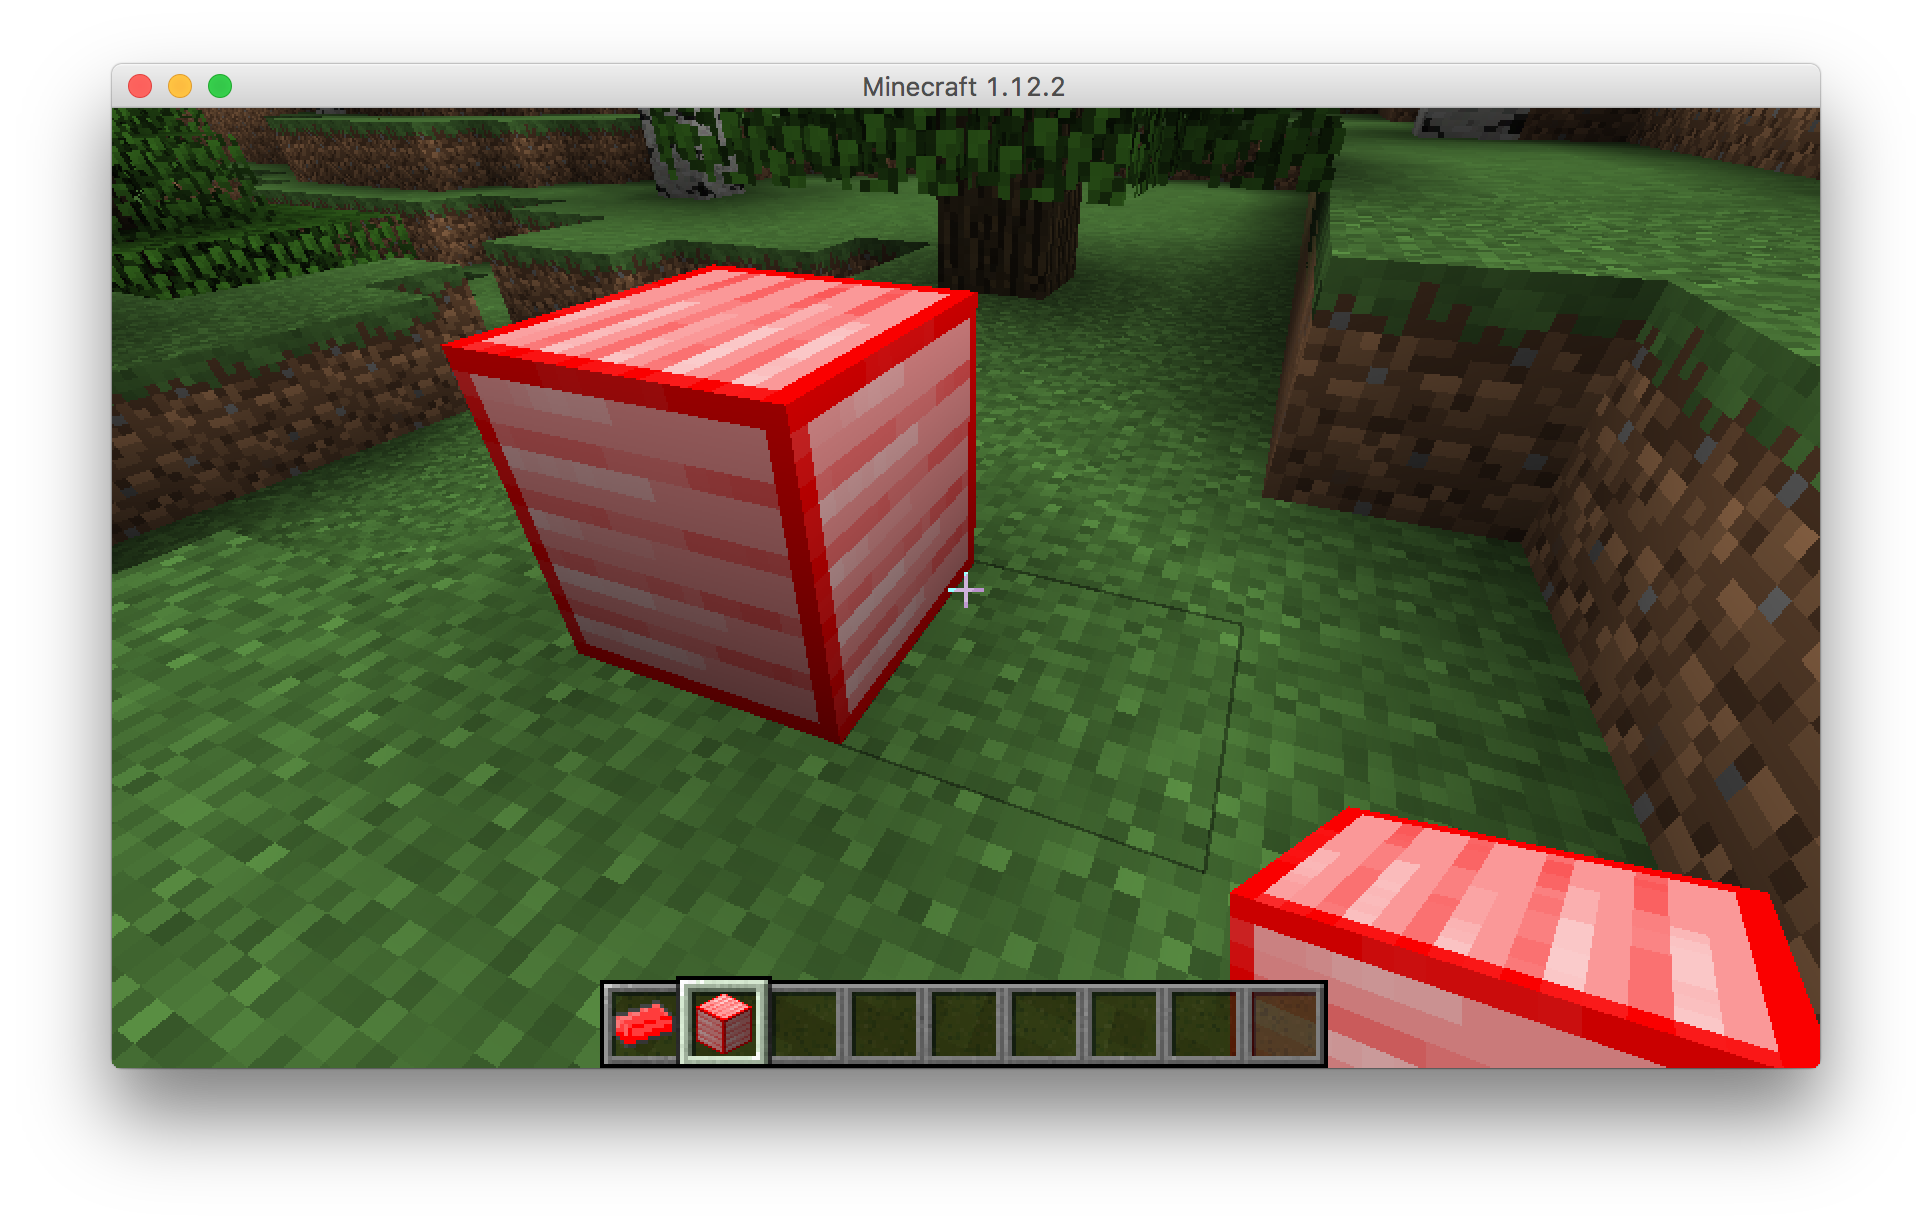
最后,进入游戏。
新的配方
第一种注册方法
在 IngotRuby.java 里添加一个类,registerRecipe(),同理在 BlockRuby.java 也添加一个类,这个是用来注册配方的。
合成配方需要使用
net.minecraftforge.oredict.ShapedOreRecipe;
net.minecraftforge.oredict.ShapelessOreRecipe;
两个呢,区别在于 Shaped 是要完完全全的一样,Shapeless 就是 Shaped 的反义词,无定形的,类似蘑菇汤。
那就从红宝石锭的配方开始吧,代码都是相似的,讲一个就行了。
在 IngotRuby.java 中添加方法,并且 new 一个 ShapedOreRecipe 出来。
| |
new ShapedOreRecipe 的时候有四种不同的方式,最后一种,我们可以暂时忽略,更多的是关注第三种,
| |
第一个参数可以先忽略,主要是第二个,ItemStack, Stack 这个词是栈,通俗的理解,堆,那这个 ItemStack 是什么?
在游戏初始化的时候,物品会被加载到内存,但如果说玩家有 64 个这个物品呢,不可能把 64 个全部加入内存,因为是重复的东西,浪费内存,这时候 ItemStack 出现了,这个 stack 里包含了玩家有多少这个物品,每个物品的 metadata,等等。
具体的,等基础教程完事,写进阶的再说吧. (立下 Flag 了…
后面跟着的参数,recipe 就是配方了,这个配方是按找行走的,比如合成一个稿子,那它的配方就是 “AAA”," B ”," B ",注意 B 前后有空格,这里面 A 就是矿石,B 就是木棍
ok,可以开始红石锭的制作了。
在前面的 registerRecipe 方法里,新建一个 ResourceLocation,并新建一个 ShapedOreRecipe
| |
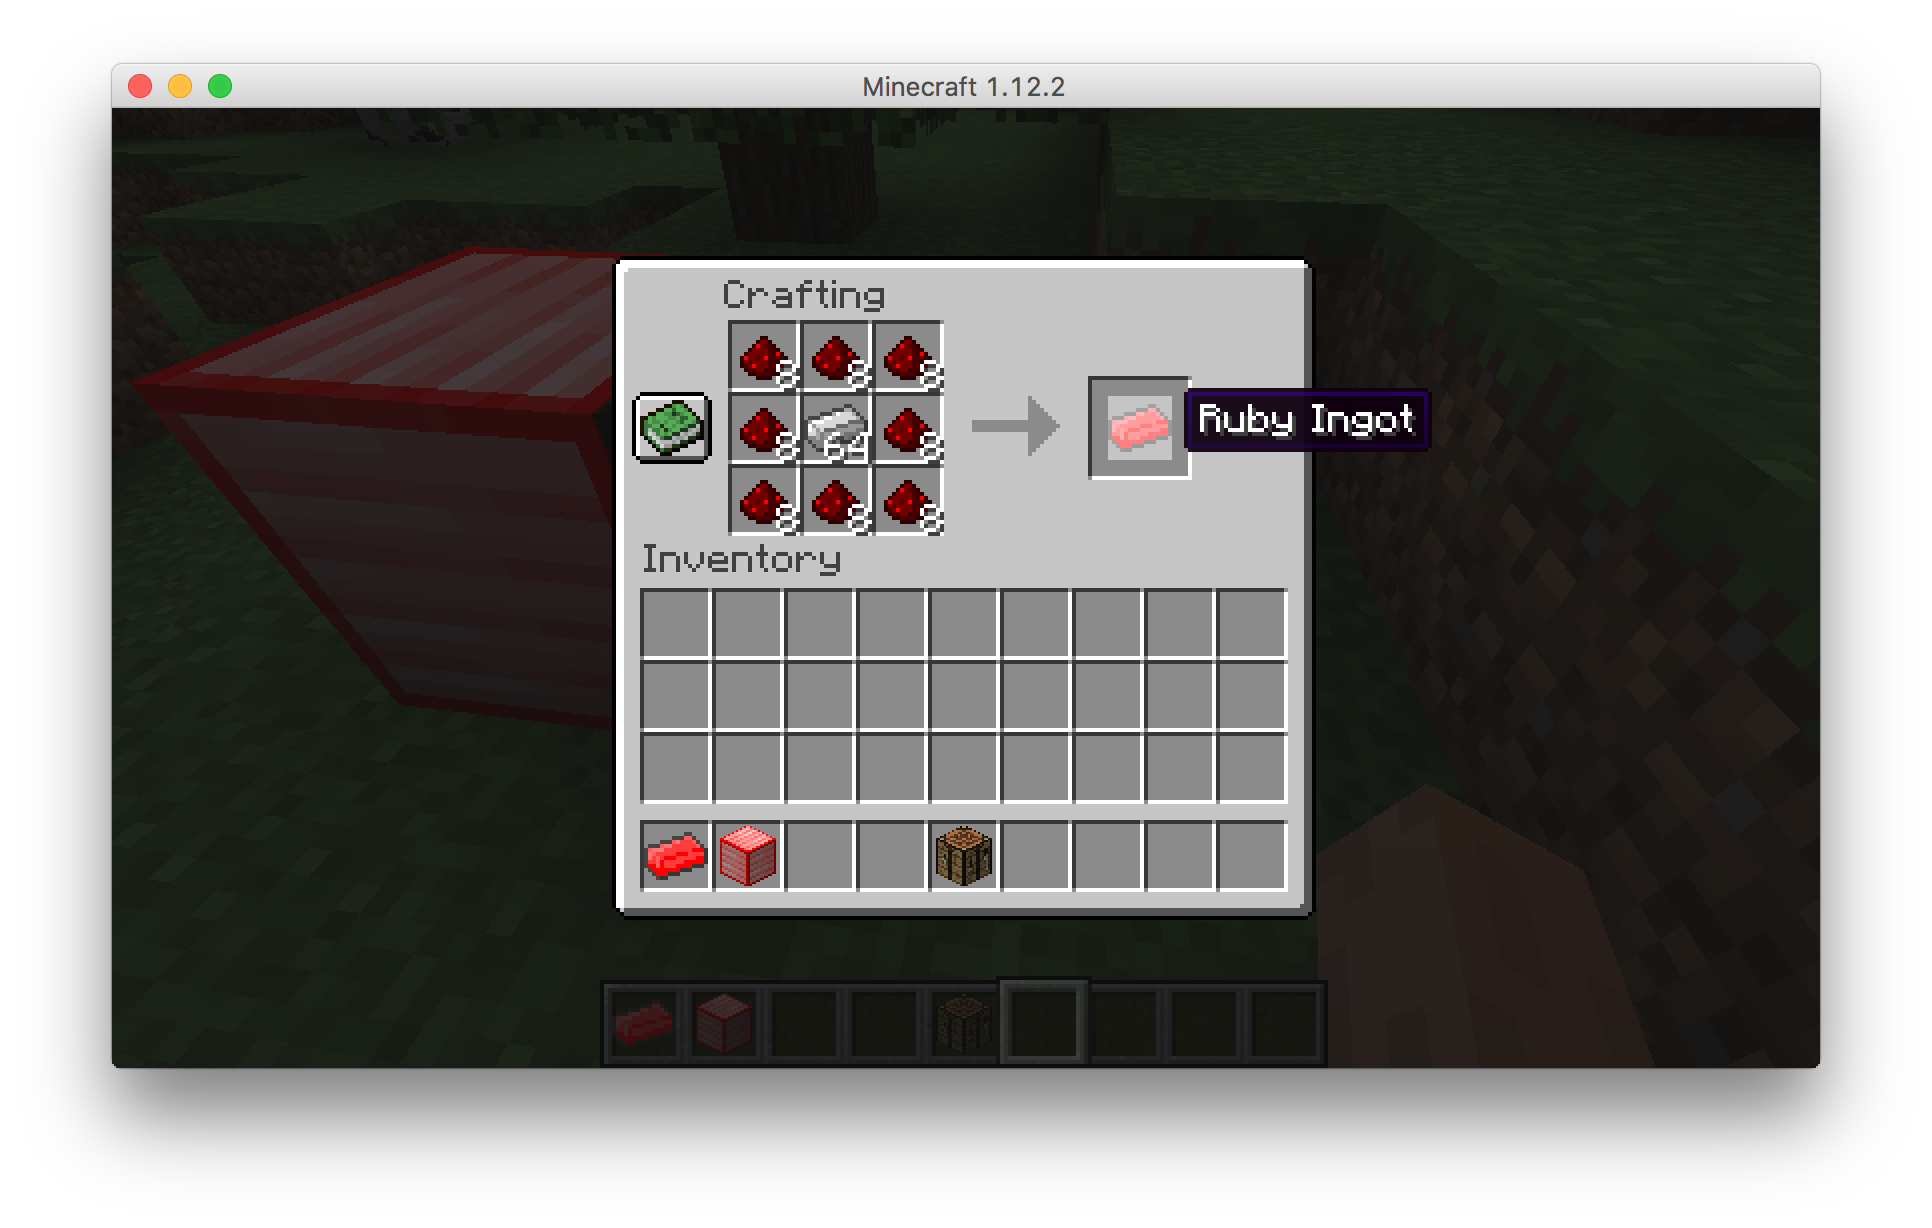
然后,IDE 会报错,因为还没有添加具体的配方,在前面也提到过,红宝石锭的配方是 8 个红石围着一个铁锭,根据上面的提示,配方应该是这样,“AAA”, “ABA”, “AAA”, A 是红石,B 是铁锭,所以把配方加到参数里,在配方后面跟着的就是定义 A,B…是什么了,注意配方用的是 ",定义的名字用的',在 java 中一个是 String 一个是 char 有很大的区别,然后在用中 ForgeRegistries 注册这个配方,对了不要忘记要设置一个 registername,和当前 item 一样就好了。
| |
然后在 Item 类中的 register 调用 registerRecipe
| |
然后看一下整体的代码
| |
运行游戏,使用这个配方
同理,我们写一下 Ruby Block 的配方。
但是使用自己的物品时,会有一个问题,这个配方会需要自己的物品,它不像 Minecraft 内部物品可以通过 Items.xxx 获取,这时候,进入主类,把 ingotRuby 设置成 public
| |
然后在 BlockRuby 中的 registerRecipe 使用 Ruby.ingotRuby 使用这个红宝石锭。
| |
然后进入游戏,测试一下红宝石块的配方。
第二种注册方法
Forge 实际上也提供了另一种方法注册配方
这个方法不需要写代码,而是在 resources/assets 里新建一个 recipes/的文件夹,并新建 json 文件。根据里面的内容,Forge 会自动读取,然后注册到游戏中。所以名字是无所谓的,但一定要易读,什么意思?就是要看一眼就知道他是干什么的,因为一个方块可能会有多种合成方法。
$ tree resources/
resources/
├── assets
│   └── ruby
│       ├── blockstates
│       │   └── blockruby.json
│       ├── lang
│       │   └── en_us.lang
│       ├── models
│       │   ├── block
│       │   │   └── blockruby.json
│       │   └── item
│       │       ├── blockruby.json
│       │       └── ingotruby.json
│       ├── recipes
│       │   ├── blockruby.json
│       │   ├── ingotruby_from_compose.json
│       │   └── ingotruby_from_decompose.json
│       └── textures
│           ├── block
│           │   └── blockruby.png
│           └── item
│               └── ingotruby.png
├── mcmod.info
└── pack.mcmeta

11 directories, 11 files
像上面,我的 Ruby ingot 可以有两种获取方式,一个是通过红石 + 铁锭合成,另一个是分解 Ruby Block 获得 9 个,所以有一个是 compose 和一个 decompose.
在 recipes/里面的文件应该使用下面这个的结构
| |
| |
然后,有人问,如果这个 A 可以代表不同的东西呢?那就要把 A 改成一个数组
| |
上面给出的是 Shaped 的,那 Shpaeless 的又是怎样呢?
同理,这个也是在 recipes/里面,只不过文件中的 type 变成了 “crafting_shapeless”,类似蘑菇汤就是 shapeless
| |
区别在于,Shpaed 的配方需要 pattern 和 key,而 Shapeless 的只需要提供 Ingredients(材料).
当然,更推荐第二种合成方式,不仅仅是因为当你打开原生版本的 jar 文件,Minecraft 原生使用了这种方法。同时这种方法更容易管理,以及改动时,不需要动代码。
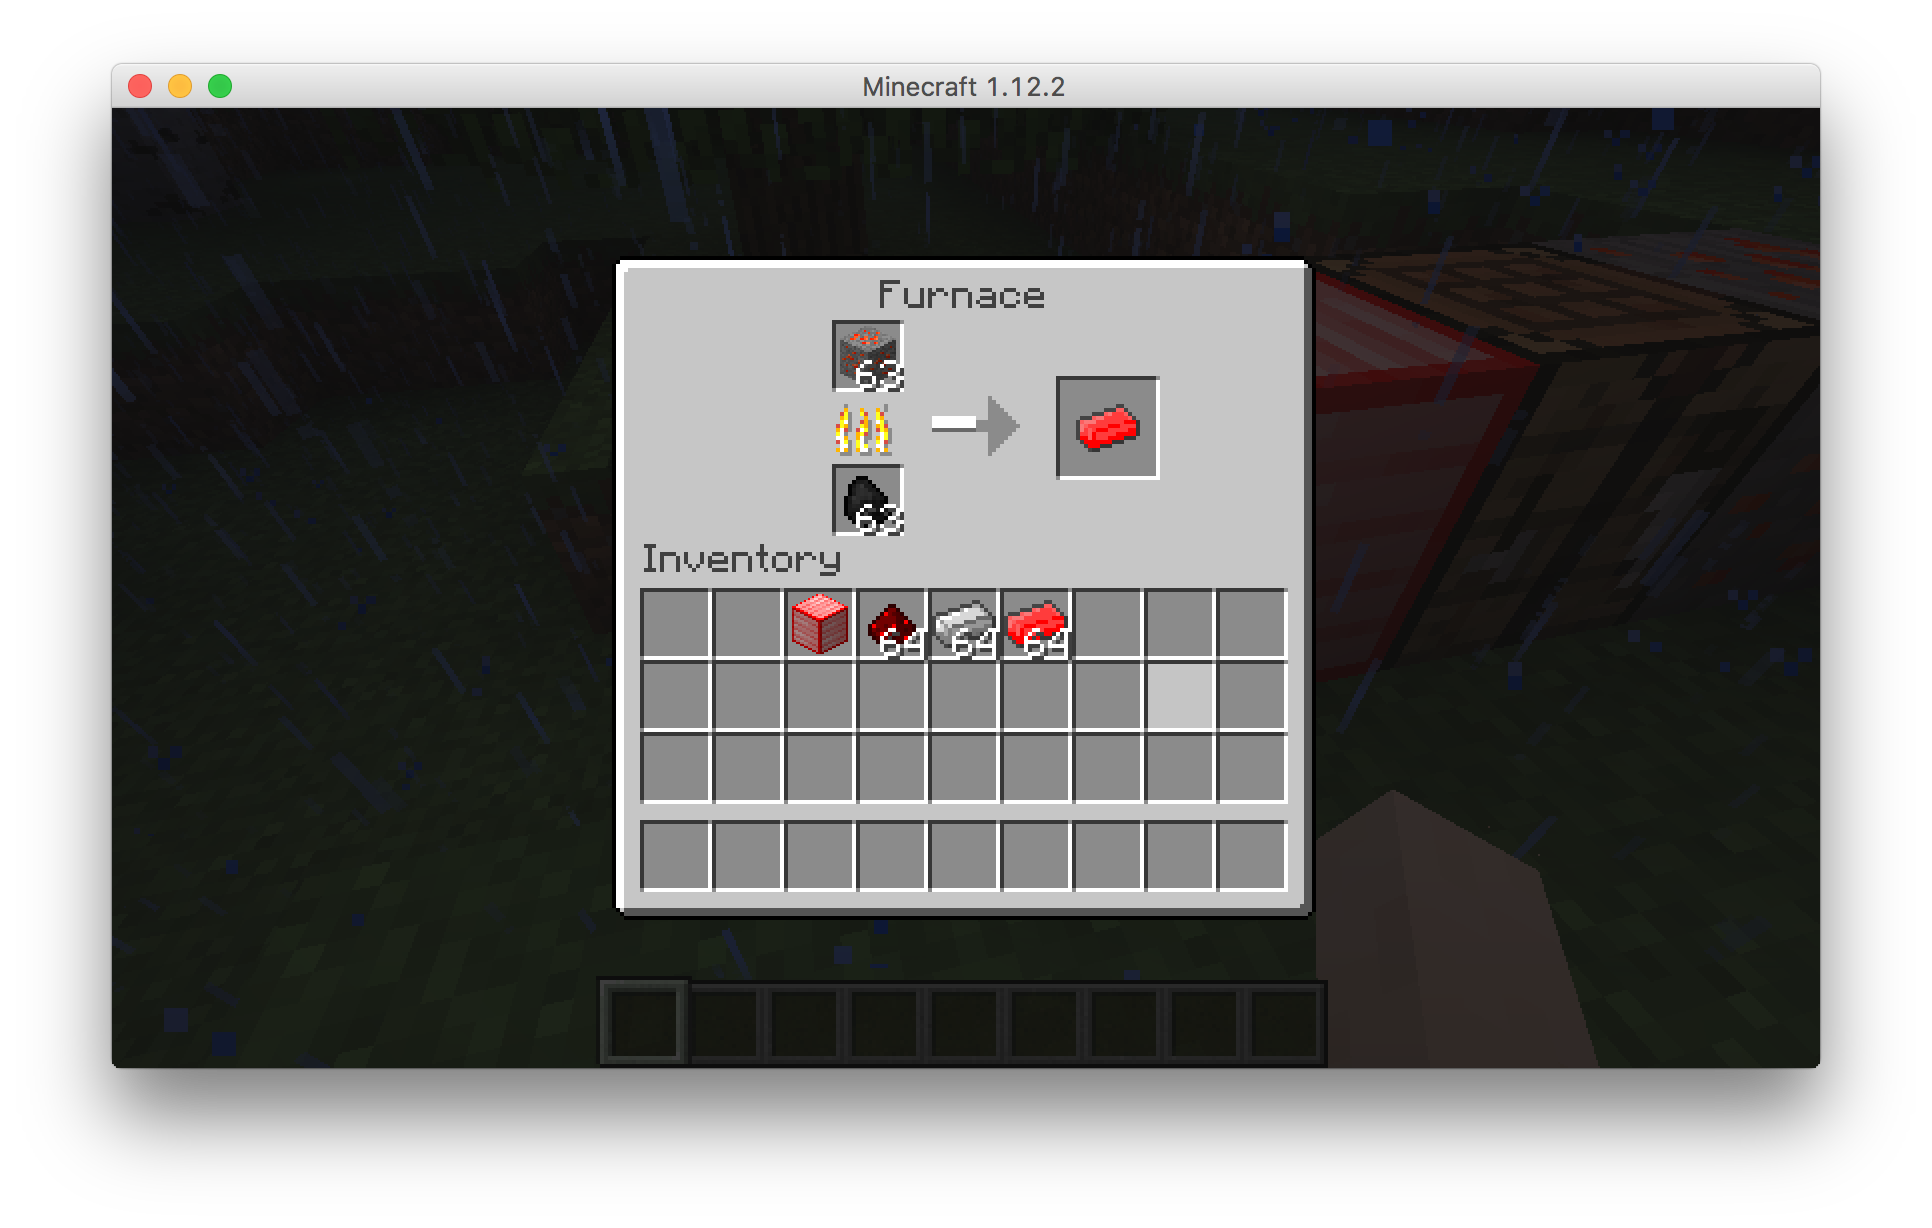
新的熔炼
熔炼也是 Minecraft 原生中重要的一个部分,烧铁矿石才能得到铁锭,所以要新建一个矿石,红宝石矿石 (Ruby Ore),在这章之后,应该会有一章讲如何讲矿石加入世界的生成里,比如原生中的铁,煤,钻石等
……… 根据前面的内容制作
制作完成之后,目录结构应该差不多是这样。
$ tree src/

src
└── main
    ├── java
    │   └── xyz
    │       └── rankki
    │           └── ruby
    │               ├── Ruby.java
    │               ├── blocks
    │               │   ├── BlockOreRuby.java
    │               │   └── BlockRuby.java
    │               └── items
    │                   └── IngotRuby.java
    └── resources
        ├── assets
        │   └── ruby
        │       ├── blockstates
        │       │   ├── blockoreruby.json
        │       │   └── blockruby.json
        │       ├── lang
        │       │   └── en_us.lang
        │       ├── models
        │       │   ├── block
        │       │   │   ├── blockoreruby.json
        │       │   │   └── blockruby.json
        │       │   └── item
        │       │       ├── blockoreruby.json
        │       │       ├── blockruby.json
        │       │       └── ingotruby.json
        │       ├── recipes
        │       │   ├── blockruby.json
        │       │   ├── ingotruby_from_compose.json
        │       │   └── ingotruby_from_decompose.json
        │       └── textures
        │           ├── block
        │           │   ├── blockoreruby.png
        │           │   └── blockruby.png
        │           └── item
        │               └── ingotruby.png
        ├── mcmod.info
        └── pack.mcmeta

19 directories, 20 files
和配方不同,熔炼暂时不支持使用 recipes/xxx.json 代替代码。据说 1.13 会支持。
所以在我们新建好的 BlockOreRuby.java 新加一个方法 registerSmelt 然后调用 GameRegistry.addSmelting();
| |
本质上都是一样的,根据需要直接调用
| |
最后一个 xp,烧一个金矿也就 1f 所有这里也先设置成 1f.
然后在 register 方法里调用,并进入游戏。
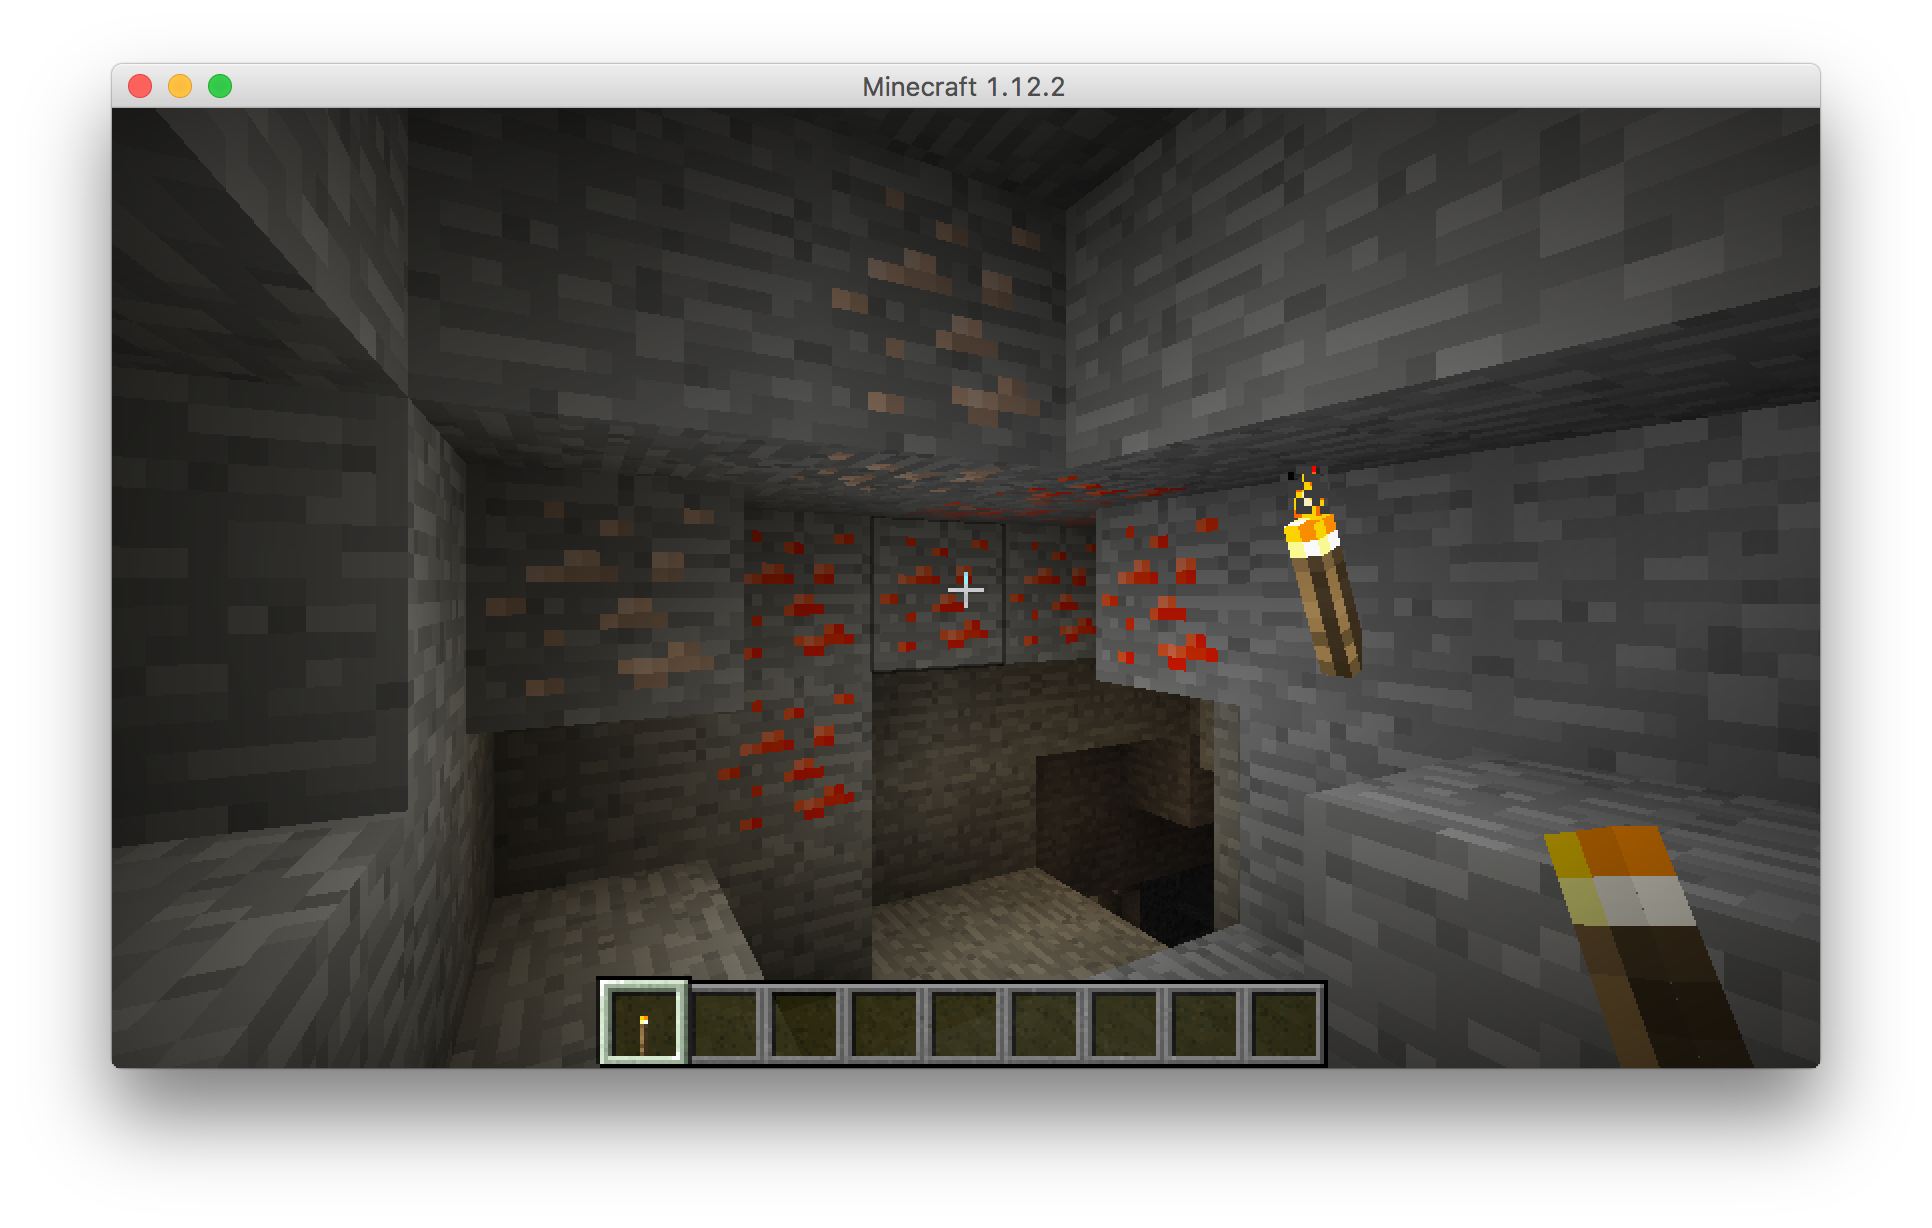
生成器
GameRegistry.registerWorldGenerator
MinecraftForge 提供了一个借口,IWorldGenerator,就是在世界初始化的时候根据种子进行生成世界方块的一个东西。
首先在项目里新建一个包,generator/ 并新建一个类,就叫 OreRubyGeneator 了,使这个红宝石 mod 的项目看起来像这样。
$ tree src/
src/
└── main
    ├── java
    │   └── xyz
    │       └── rankki
    │           └── ruby
    │               ├── Ruby.java
    │               ├── blocks
    │               │   ├── BlockOreRuby.java
    │               │   └── BlockRuby.java
    │               ├── generator
    │               │   └── OreRubyGenerator.java
    │               └── items
    │                   └── IngotRuby.java
    └── resources
        ├── assets
        │   └── ruby
        │       ├── blockstates
        │       │   ├── blockoreruby.json
        │       │   └── blockruby.json
        │       ├── lang
        │       │   └── en_us.lang
        │       ├── models
        │       │   ├── block
        │       │   │   ├── blockoreruby.json
        │       │   │   └── blockruby.json
        │       │   └── item
        │       │       ├── blockoreruby.json
        │       │       ├── blockruby.json
        │       │       └── ingotruby.json
        │       ├── recipes
        │       │   ├── blockruby.json
        │       │   ├── ingotruby_from_compose.json
        │       │   └── ingotruby_from_decompose.json
        │       └── textures
        │           ├── block
        │           │   ├── blockoreruby.png
        │           │   └── blockruby.png
        │           └── item
        │               └── ingotruby.png
        ├── mcmod.info
        └── pack.mcmeta

20 directories, 21 files
然后在 OreRubyGenerator 类中引入 net.minecraftforge.fml.common.IWorldGenerator.并加入方法
@Override
public void generate(Random random, int chunkX, int chunkZ, World world,
                    IChunkGenerator chunkGenerator, IChunkProvider chunkProvider) {

}
其中的 random 是根据世界种子为种子建立出的一个 Random 对象,chunkX,chunkZ 则是这个 chunk 的位置. world 为当前世界对象,chunkGenerator 和 chunkProvide 目前用不到,就先跳过。
在这份 generate 方法里是我们需要随机出来 3 个指,x,y,z 用于生成矿石所在位置,顺带一提,每一个 chunk 是一个 16*16 的大小。
| |
根据 world.provider.getDimension() 获取的指是代表着这个世界的纬度,0 为普通世界,-1 是地狱,1 是末地
| |
这是生成 x,y,z 在世界中的位置,因为 chunkX 和 chunkZ 代表着 chunk 在世界的位置,再加上每个 chunk 是 16*16 的大小,所以将其乘上 16 就是在世界中的绝对位置,在加上 0-16 中的一个随机数,随机一下这个位置. y 则是看心情,可以在设置成任意高度的随机数. 13 + 随机数代表了最低高度也是 13 层。最高则是 63 层。
详细的 WorldGenMinable
WorldGenMinable 这个类也是 Minecraft 提供的一个结构,可以生成随机矿石,具体的算法有兴趣的可以自己看一看,这里就直接调用了,在新建一个 WorldGenMinalbe 对象的时候,需要提供两个参数
| |
IBlcokState 和 blockcount,第一个是方块的 state,第二个是一次生成多少个。
但你会发现,他其实是有三个参数的,最后一个是 Predicate
| |
在生成矿石算法的最后一步,会对当前的方块嘴个判断,isReplaceableOreGen 是否可以被矿石替换,这里就用到了 Predicate
再进一步看源码,
| |
是根据 Predicate
在前面没有提供这个 target 的时候,默认的 WorldGenMinable.StonePredicate().
| |
他是判断了当前的方块是否为石头,并且判断了这个是石头的类型是否为 Natural,那根据代码,为 Natural 的石头只有
| |
这四个,如果碰到其他类型的时候,他就不会替换。
回到主题
根据
| |
建立好了一个 WorldGenMinalbe 对象,生成的是 blockOreRuby,一次生成 20 个,那下一步就是生成了。
| |
将当前 world 和 random 对象传入,以上面生成的 xyz 新建一个世界方块位置。
以上就是世界初始化时如何加入自己的矿石的步骤,
注册到游戏
但是只有以上的代码并没有用,因为还没有注册到游戏。
根据个人代码风格,无论是在主类直接调用 GameRegistry.registerWorldGenerator 还是在这个 generator 里新建一个静态方法调用,(只要用了就行
我实在这个 generator 里新建了一个静态方法 init()
| |
并在主类的注册之中调用,OreRubyGenerator.init();
使用GameRegistry.registerWorldGenerator需要传入两个参数,第一个自然是 generator 对象,第二个是权重。
| |
根据注释,这个权重代表着执行顺序,越大的数字,执行顺序就越靠后. (所以设置为 0.
使用事件监听器
先上代码
public class OreRubyGenerator {

    private static WorldGenMinable worldGenMinable = new WorldGenMinable(Blocks.blockOreRuby.getDefaultState(), 20);

    public static void init() {
        MinecraftForge.ORE_GEN_BUS.register(OreRubyGenerator.class);
    }

    @SubscribeEvent
    public static void onGenerateMinable(OreGenEvent.GenerateMinable event) {
        if (event.getType() != OreGenEvent.GenerateMinable.EventType.IRON){
        	return;
        }


        if (!TerrainGen.generateOre(event.getWorld(), event.getRand(), worldGenMinable, event.getPos(),
                OreGenEvent.GenerateMinable.EventType.CUSTOM)){
                return;
                }

        for (int i = 0; i < 4; i++) {
            int posX = event.getPos().getX() + event.getRand().nextInt(16);
            int posY = 16 + event.getRand().nextInt(40);
            int posZ = event.getPos().getZ() + event.getRand().nextInt(16);
            worldGenMinable.generate(event.getWorld(), event.getRand(), new BlockPos(posX, posY, posZ));
        }
    }
}
在 onGenerateMinable 这个事件里
- 第一个 if 判断是判断生成的是不是铁,这个可以让这个红宝石矿和铁一起生成。
- 第二个 if 是告诉游戏,“诶诶诶,我现在要生成红宝石矿了”
- 第三个 for 是让这个循环四次,因为在一个 chunk 了,不可能只生成一次,这里就可以靠喜好了。
然后,进入游戏,找新矿石吧。
新的工具
新的工具,需要一个新的材质,以及一个新的模型和类。根据以往的经验可以直接新建这些.然后目录结构。
$ tree src/
src/
└── main
    ├── java
    │   └── xyz
    │       └── rankki
    │           └── ruby
    │               ├── Ruby.java
    │               ├── blocks
    │               │   ├── BlockOreRuby.java
    │               │   └── BlockRuby.java
    │               ├── generator
    │               │   └── OreRubyGenerator.java
    │               └── items
    │                   ├── IngotRuby.java
    │                   └── PickaxeRuby.java
    └── resources
        ├── assets
        │   └── ruby
        │       ├── blockstates
        │       │   ├── blockoreruby.json
        │       │   └── blockruby.json
        │       ├── lang
        │       │   └── en_us.lang
        │       ├── models
        │       │   ├── block
        │       │   │   ├── blockoreruby.json
        │       │   │   └── blockruby.json
        │       │   └── item
        │       │       ├── blockoreruby.json
        │       │       ├── blockruby.json
        │       │       ├── ingotruby.json
        │       │       └── pickaxeruby.json
        │       ├── recipes
        │       │   ├── blockruby.json
        │       │   ├── ingotruby_from_compose.json
        │       │   └── ingotruby_from_decompose.json
        │       └── textures
        │           ├── blocks
        │           │   ├── blockoreruby.png
        │           │   └── blockruby.png
        │           └── items
        │               ├── ingotruby.png
        │               └── pickaxeruby.png
        ├── mcmod.info
        └── pack.mcmeta

20 directories, 24 files
update. 注意,在 models 里的 pickaxeRuby.json 的内容的 parent 和以往普通物品不同,它的 parent 应该是 item/handheld
{ “parent”: “item/handheld”, “textures”: { “layer0”: “ruby:items/pickaxeruby” } }
首先,需要让 PickaxeRuby 类继 net.minecraft.item.ItemPickaxe,因为这个部分就是设计一个红宝石镐。

ItemPickaxe 需要传入一个工具材质,这里直接用钻石等级的材质。

```java
public PickaxeRuby() {
    super(ToolMaterial.DIAMOND);
}
然后在主类和其他物品一样,新建对象,调用方法,并在语言文件中给它一个名字。
另一个类
但这样的话,这个镐子必须要继承 ItemPickaxe 所设置的配置,如果想自定义怎么办,比如攻击造成的伤害量,冷却时间之类的,那这里就需要直接继承 ItemTool
| |
第一个浮点值是攻击伤害量,第二个冷却时间 (正数减小冷却,负数增加冷却),第三个则是物品材质,第四个是对特殊方块的速度加成。
然后这样还不够,因为他只是个工具,必须要让他和镐子一样可以挖掘方块。
| |
让这个工具成为一个第三等级的镐子,
| |
继续制作工具
那根据以上的信息,写代码,并新建 register 方法们。
public class PickaxeRuby extends ItemPickaxe {

    private static final String name = "PickaxeRuby";
    public static final String registryName = Ruby.modid + ":" + name;
    private static final String unlocalizedName = Ruby.modid + "." + name;

    public PickaxeRuby() {
        super(ToolMaterial.DIAMOND);
        setRegistryName(registryName);
        setUnlocalizedName(unlocalizedName);
    }

    public void register() {
        ForgeRegistries.ITEMS.register(this);
    }

    public void registerTextures() {
        Minecraft.getMinecraft().getRenderItem()
                .getItemModelMesher()
                .register(this, 0,
                        new ModelResourceLocation(registryName, "inventory"));
    }
}
可能有人会问,为什么没有设置在创造模式中的菜单位置,因为在 ItemTool 类中,已经调用了this.setCreativeTab(CreativeTabs.TOOLS);
合成配方
在 recipes/里新建一个文件,pickaxeruby.json,根据普通镐子来做配方。
木根的 id 是 minecraft:stick
注意在 B 的左右是有空格的。
| |
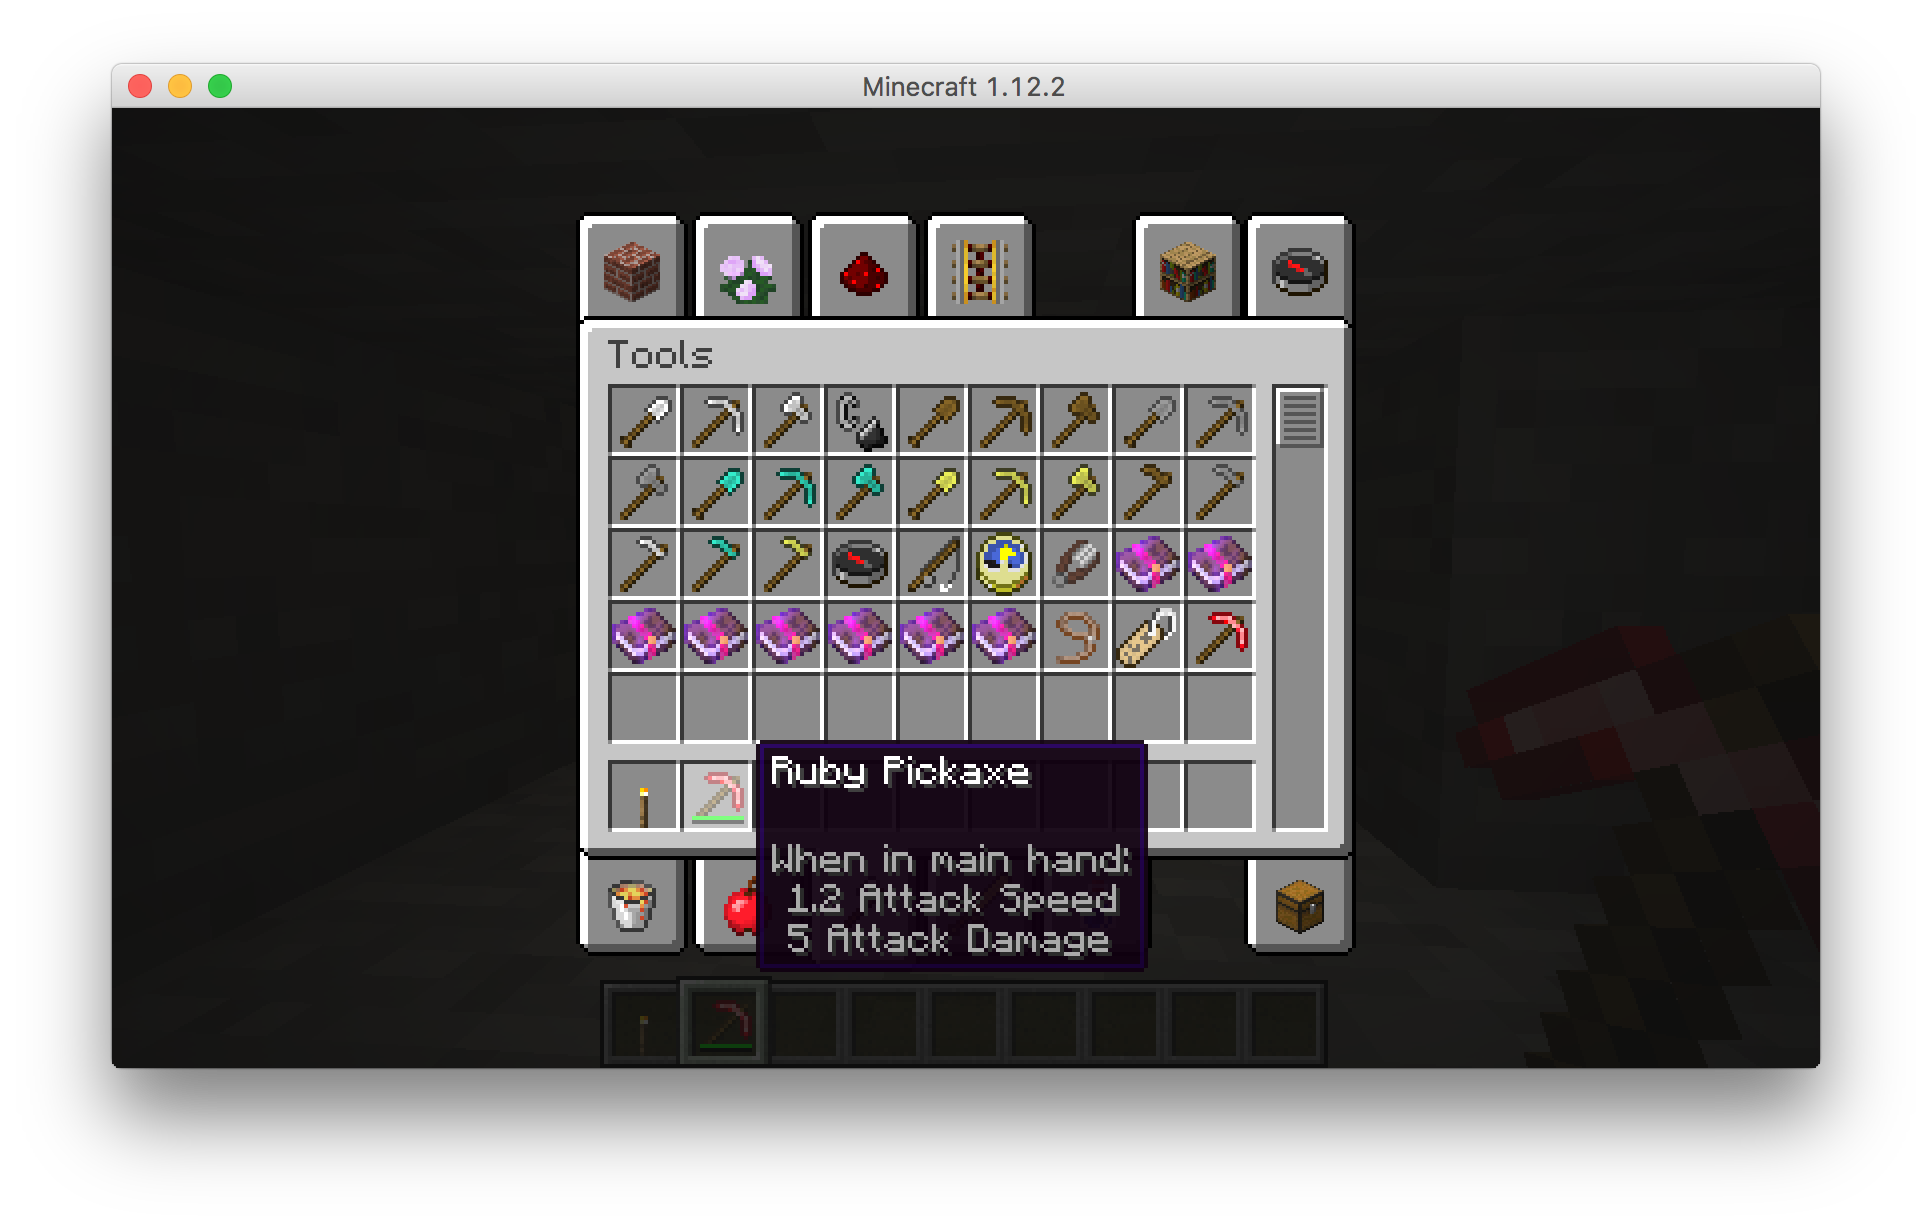
然后就是进入游戏。
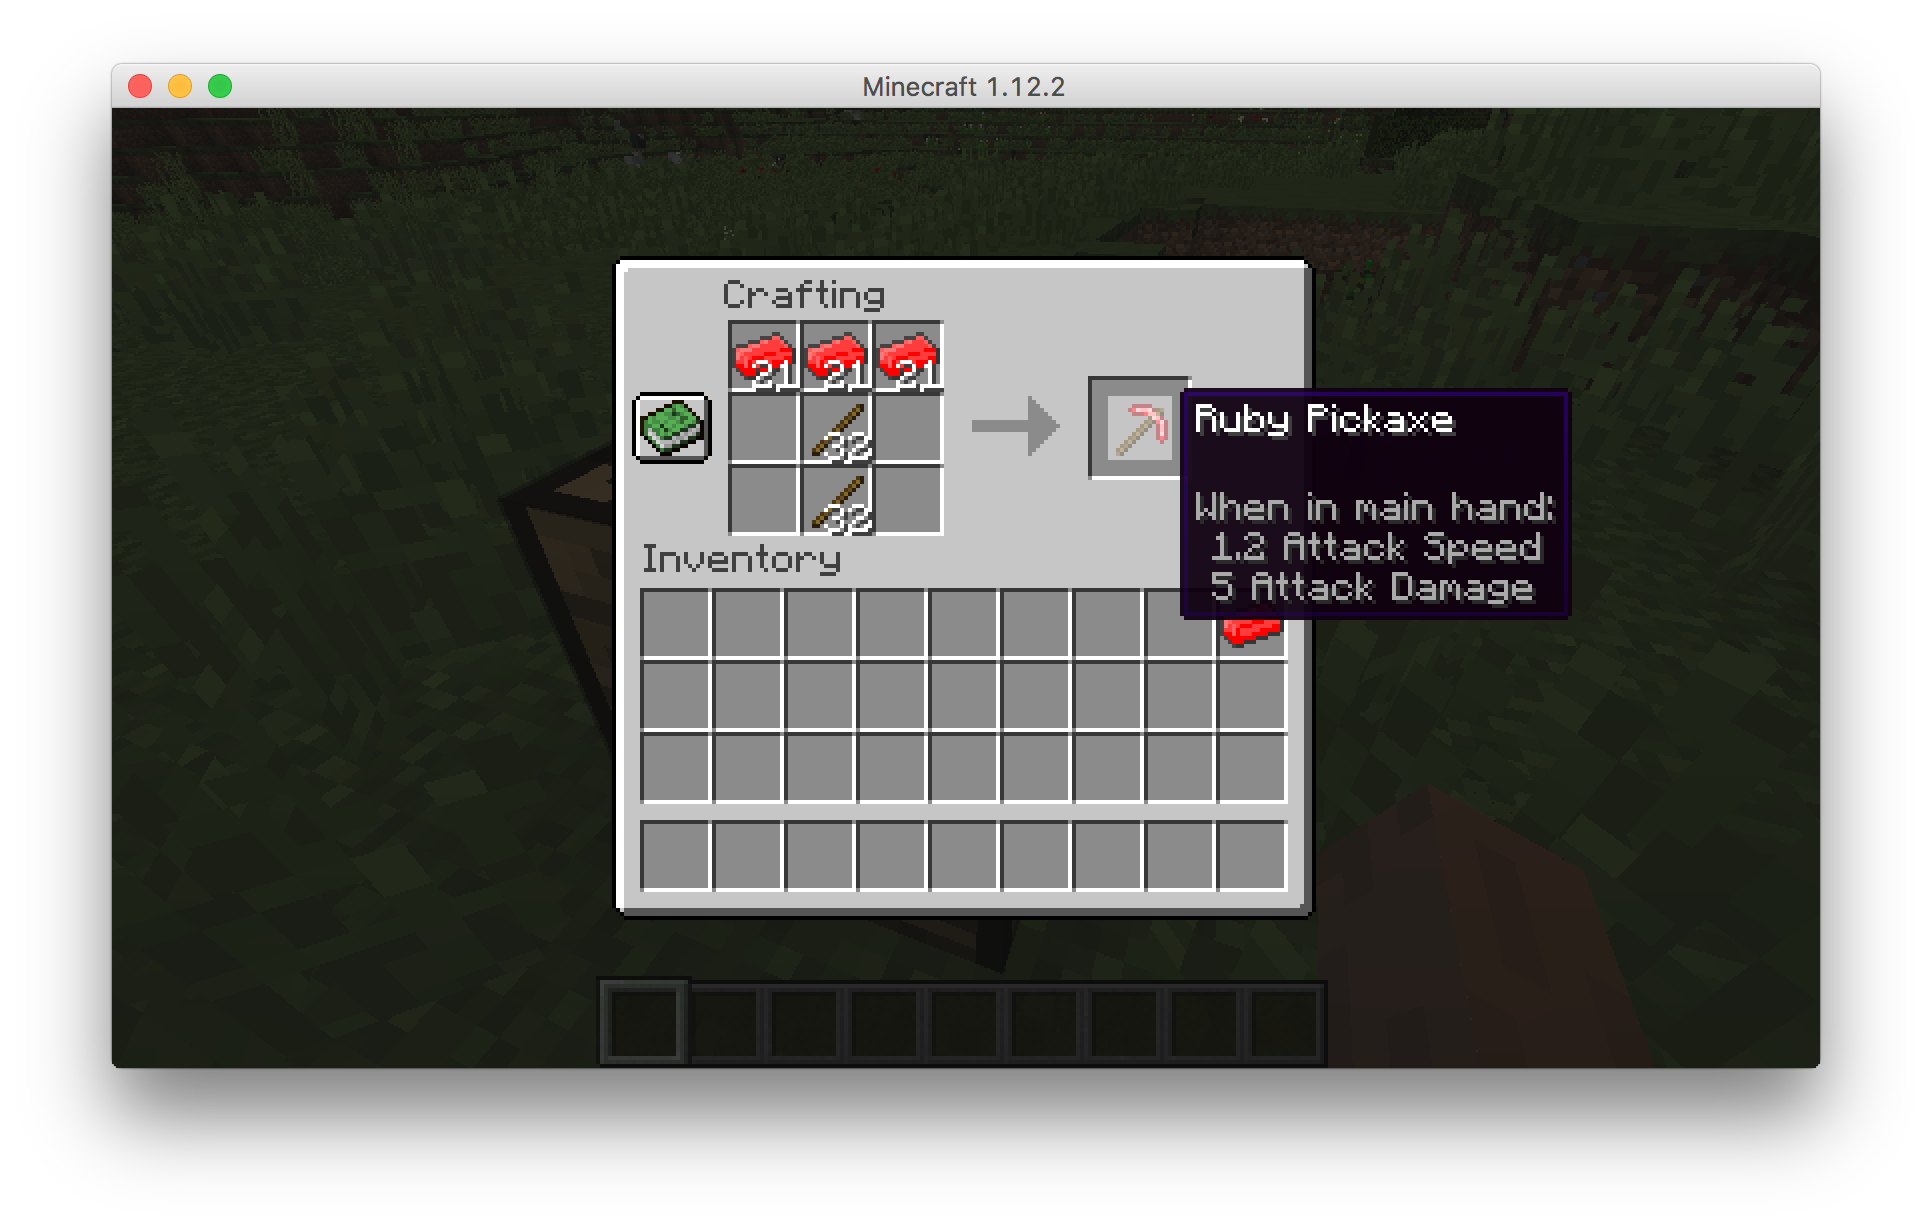
因为挖矿速度比较快,截不到图.. 就放一个背包里的图吧。
打包
打包可以说是很重要的一步,因为做好的 mod 当然要分享出去,给别人玩啦。或者说放到自己的游戏里,毕竟 mdk 里的 Minecraft 是开发用的。
update,代码被改了些… 更新部分可以到github#296d451查看
Here we go
在完成所有基础部分后,目录应该是这样的
$ tree src/
src
└── main
    ├── java
    │   └── xyz
    │       └── rankki
    │           └── ruby
    │               ├── Ruby.java
    │               ├── blocks
    │               │   ├── BlockOreRuby.java
    │               │   └── BlockRuby.java
    │               ├── generator
    │               │   └── OreRubyGenerator.java
    │               └── items
    │                   ├── IngotRuby.java
    │                   └── PickaxeRuby.java
    └── resources
        ├── assets
        │   └── ruby
        │       ├── blockstates
        │       │   ├── blockoreruby.json
        │       │   └── blockruby.json
        │       ├── lang
        │       │   └── en_us.lang
        │       ├── models
        │       │   ├── block
        │       │   │   ├── blockoreruby.json
        │       │   │   └── blockruby.json
        │       │   └── item
        │       │       ├── blockoreruby.json
        │       │       ├── blockruby.json
        │       │       ├── ingotruby.json
        │       │       └── pickaxeruby.json
        │       ├── recipes
        │       │   ├── blockruby.json
        │       │   ├── ingotruby_from_compose.json
        │       │   ├── ingotruby_from_decompose.json
        │       │   └── pickaxeruby.json
        │       └── textures
        │           ├── blocks
        │           │   ├── blockoreruby.png
        │           │   └── blockruby.png
        │           └── items
        │               ├── ingotruby.png
        │               └── pickaxeruby.png
        ├── mcmod.info
        └── pack.mcmeta

20 directories, 25 files
然后打开根目录下的 build.gradle,找到
version = "1.0"
group = "xyz.rankki.ruby" // http://maven.apache.org/guides/mini/guide-naming-conventions.html
archivesBaseName = "Ruby"
并根据需要进行更改,然后在 mdk 目录下,输入
| |
等待它配置并编译完成
To honour the JVM settings for this build a new JVM will be forked.
Please consider using the daemon: https://docs.gradle.org/2.14/userguide/gradle_daemon.html.
This mapping 'snapshot_20171003' was designed for MC 1.12! Use at your own peril.
#################################################
         ForgeGradle 2.3-SNAPSHOT-ee3e3df
  https://github.com/MinecraftForge/ForgeGradle
#################################################
                 Powered by MCP
             http://modcoderpack.com
     by: Searge, ProfMobius, R4wk, ZeuX
     Fesh0r, IngisKahn, bspkrs, LexManos
#################################################
:deobfCompileDummyTask
:deobfProvidedDummyTask
:sourceApiJava
:compileApiJava UP-TO-DATE
:processApiResources UP-TO-DATE
:apiClasses UP-TO-DATE
:sourceMainJava
:compileJava
:processResources
:classes
:jar
:sourceTestJava
:compileTestJava UP-TO-DATE
:processTestResources UP-TO-DATE
:testClasses UP-TO-DATE
:test UP-TO-DATE
:extractMcpData SKIPPED
:extractMcpMappings SKIPPED
:getVersionJson
:extractUserdev UP-TO-DATE
:genSrgs SKIPPED
:reobfJar
:extractAnnotationsJar
:extractRangemapReplacedMain
:retromapReplacedMain
remapping source...
:sourceJar
:assemble
:check UP-TO-DATE
:build

BUILD SUCCESSFUL

Total time: 32.661 secs
进入根目录的 build/文件夹,这里就是编译完的 mod 文件们,包括了源码,编译好的.class 文件,recourses 文件和打包好的 libs 文件。
$ tree build/
build
├── classes
│   └── main
│       └── xyz
│           └── rankki
│               └── ruby
│                   ├── Ruby$ClientProxy.class
│                   ├── Ruby$ServerProxy.class
│                   ├── Ruby.class
│                   ├── blocks
│                   │   ├── BlockOreRuby.class
│                   │   └── BlockRuby.class
│                   ├── generator
│                   │   └── OreRubyGenerator.class
│                   └── items
│                       ├── IngotRuby.class
│                       └── PickaxeRuby.class
├── dependency-cache
├── libs
│   ├── Ruby-1.0-sources.jar
│   └── Ruby-1.0.jar
├── resources
│   └── main
│       ├── assets
│       │   └── ruby
│       │       ├── blockstates
│       │       │   ├── blockoreruby.json
│       │       │   └── blockruby.json
│       │       ├── lang
│       │       │   └── en_us.lang
│       │       ├── models
│       │       │   ├── block
│       │       │   │   ├── blockoreruby.json
│       │       │   │   └── blockruby.json
│       │       │   └── item
│       │       │       ├── blockoreruby.json
│       │       │       ├── blockruby.json
│       │       │       ├── ingotruby.json
│       │       │       └── pickaxeruby.json
│       │       ├── recipes
│       │       │   ├── blockruby.json
│       │       │   ├── ingotruby_from_compose.json
│       │       │   ├── ingotruby_from_decompose.json
│       │       │   └── pickaxeruby.json
│       │       └── textures
│       │           ├── blocks
│       │           │   ├── blockoreruby.png
│       │           │   └── blockruby.png
│       │           └── items
│       │               ├── ingotruby.png
│       │               └── pickaxeruby.png
│       ├── mcmod.info
│       └── pack.mcmeta
├── retromapping
│   ├── replacedMain.rangemap
│   └── retromappedReplacedMain.jar
├── sources
│   ├── api
│   │   └── java
│   ├── main
│   │   └── java
│   │       └── xyz
│   │           └── rankki
│   │               └── ruby
│   │                   ├── Ruby.java
│   │                   ├── blocks
│   │                   │   ├── BlockOreRuby.java
│   │                   │   └── BlockRuby.java
│   │                   ├── generator
│   │                   │   └── OreRubyGenerator.java
│   │                   └── items
│   │                       ├── IngotRuby.java
│   │                       └── PickaxeRuby.java
│   └── test
│       └── java
├── taskLogs
│   ├── extractRangemapReplacedMain.log
│   └── retromapReplacedMain.log
└── tmp
    ├── compileJava
    │   └── emptySourcePathRef
    ├── extractAnnotationsJar
    ├── jar
    │   └── MANIFEST.MF
    ├── reobfJar
    ├── retromapReplacedMain
    │   └── rangelog7060861889199480268.txt
    └── sourceJar
        └── MANIFEST.MF

46 directories, 42 files
这里主要是专注于 libs/文件夹里的两个文件
$ tree build/libs/
build/libs
├── Ruby-1.0-sources.jar
└── Ruby-1.0.jar

0 directories, 2 files
带 sources 的是源码,另一个是编译好的 class 文件。只要把 Ruby-1.0.jar 复制出来分享到网络上或者放在在自己的游戏文件中的 mods 文件夹中就好了。